
There are so many reasons I love setting the table for an autumn feast: Thanksgiving, Rosh Hashanah, breaking the fast for Yom Kipur, Autumnal Solstice, International Talk Like a Pirate Day, Be Bald and Free Day… the list goes on.
Here, I decided to set up a formal dinner party for Halloween. A small, spooky gathering is a great way to feel festive without everyone feeling obligated to don a full costume or sit on the porch handing out candy in the cold. Then after dinner everyone can crash on the couch for apple cobbler and a scary movie. Now doesn’t that sound good?
OK, let’s start by setting the table. It all hinges on the table cloth and today I am making my own. Saddle up, this one is going to be fun!

When I initially signed on to do a sponsored post with Rit dye, I thought I would demonstrate a new way to use the dye like a funky costume or some outdoor decoarations, but after thinking about it, instead I decided to show a new way to display everyone’s favorite way to use fabric: tie dye.
Autumn is the perfect time of year to break out the tie dye. Tell me you don’t see where I am going here…

Okay, let’s get the elephant out of the room and talk about tie dye. Because tie dye gets a bad rap. People (some people) think is garish and weird. Or, as my father called it “beardy weirdy.” Which was also slang for “hippie dippy.”
Yes, tie dye is beloved by Phish loving hippies the world over, bless them, but it’s also beloved by people who know a good thing when they see it.
Me? I love to use tie dye as an active neutral. Something that goes with everything. Other active neutrals include black and white stripes, moss green, navy blue, thick silver sequins, Scotch tartan, and my personal favorite: leopard. These are colors and patterns you can add to a composition to bring all the other elements together. A common thread. Tie dye is an excellent active neutral. Especially on a dining table set with jumbled components.
See, I have a lot of nice things in my house, but a big matching formal dining set just isn’t one of them. Do I care? No. Why? Because I know I can always pull things together with an active neutral. Like tie dye!
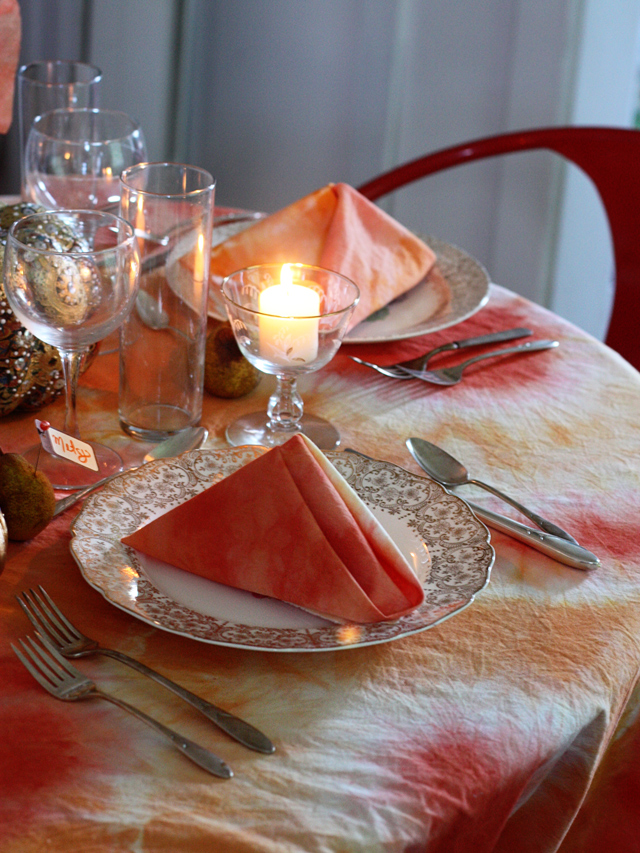
 Yup. I use disposable paper products for formal dining. Mind blown.
For this set up, the only special purchases were the black “poison” paper plates ($2.50 at Target) and some white pumpkins (2 for $1.00 at the farmers market). Everything else is from my everyday cupboard. Plain white china, plain wine glasses, melamine polka-dot plates from Target (another active neutral), some red leaf glasses I bought at Goodwill, and oodles of candles. The good silver was a gift from my friend Ann, but beyond that, nothing on the table falls in the “special occasion” category. I’m even using outdoor patio chairs. But, put them all together on a tie dye background and they sure do look gussied up! If I had done this set this all on a white table cloth it would have been totally Snoozeville. Tie dye is the trick.
Bonus: Sloppy dinner guests? Tie dye hides stains like nothing else. Score!

Before showing you how to make this, I want to say two things:
- It is really hard to take pictures while wearing rubber gloves.
- There are endless varieties of colors and patterns you can achieve with various tie-dye techniques. Rit has great information about this online. Consult with them and the directions on the package for specifics, but I can assure you it is easier than you think. Just don’t let yourself get hooked on a visual in your mind before you start the process. Embrace the unpredictable.
Materials
- One cotton flat sheet
- Half a bottle of Tangerine Rit Fabric Dye
- Half a bottle of Scarlet Rit Fabric Dye
- 20 rubber bands
- Salt
- One large pot of simmering hot water

Dye Bath (Follow directions on your box depending on your garment, below is what I used)
In an old pot on the stove, I mixed one quart of simmering water with half a bottle of dye, plus half a cup of salt. I stirred for a minute, then turned off the heat and dipped my big wad of fabric, starting with the lightest color first.
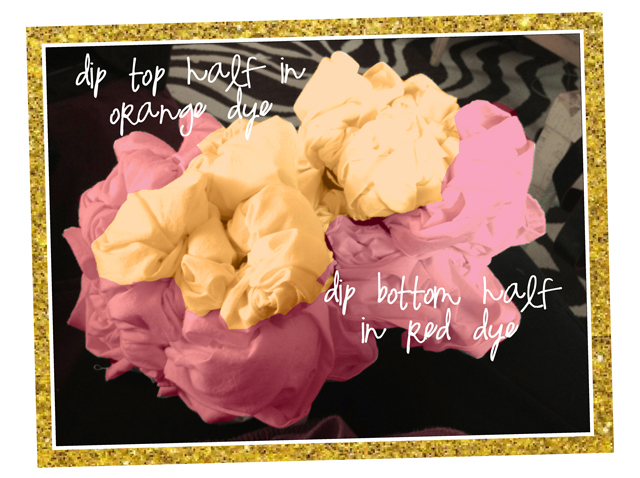
This part is hard to demo in pictures so I photoshopped a black and white photo with pink and orange to help illustrate (see above, does it help?). The gist of it is that I dipped the top half of the wadded up sheet in orange dye, let it sit there for a couple of minutes, then lipped it over and dipped the bottom half in red dye. I knew red would be the hardest color to achieve with fabric dye, so I let it set in there for a couple of hours. Then I rinsed it out with cold water in the sink, then threw it into the washing machine with the teensiest bit of soap. Cold water cycle, rubber bands still on there. When the wash was done I removed the rubber bands and threw it in the dryer on the hottest setting (heat helped set the color and thicken the cotton sheet a little).
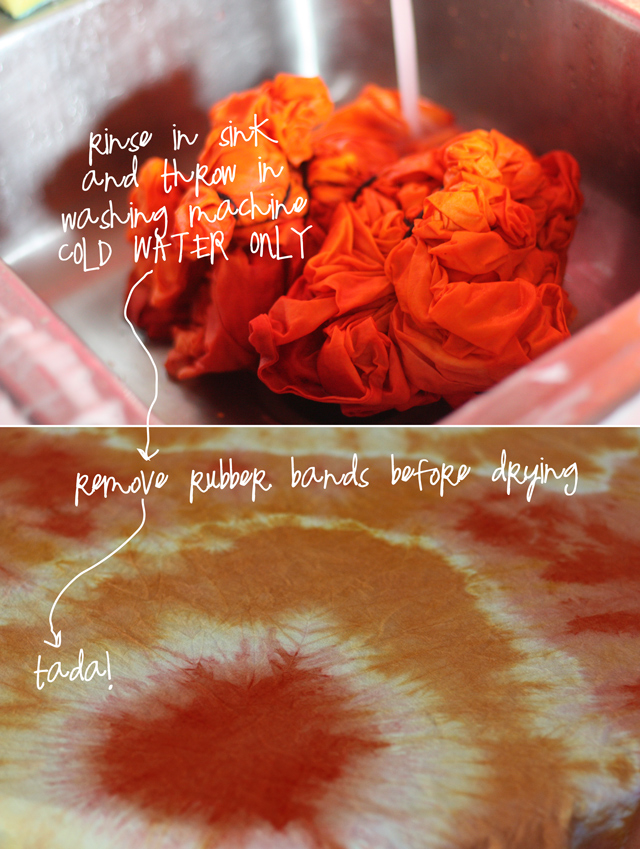
I love it. It came out a little lighter than I expected, but I love it just the same. It looks both autumnal and spring like. Now I can use it year round. Toot toot!
If I wanted to go back in time and hold out for deeper reds and oranges, I probably would have used whole bottles dye (instead of half) and let the fabric set in the pot overnight. Maybe that pinch of washing detergent was a no-no. Oh well, I don’t care, ’cause I love it!
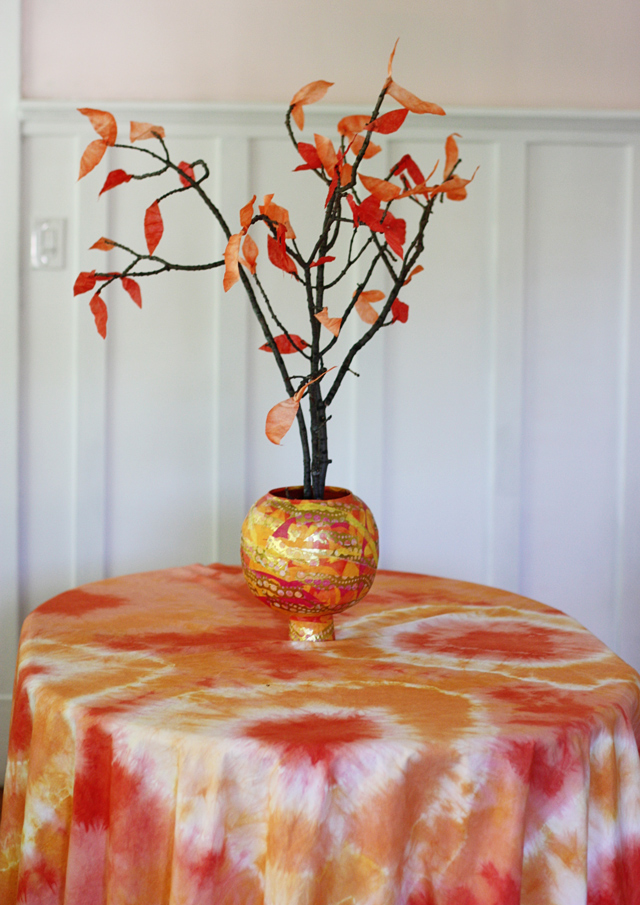
Side note: You like the autumnal tree centerpiece? It matches, right? I know. I tossed a few coffee filters in the leftover dye baths, then I cut out leaves and hot glued them to an old branch. See my cherry blossom tree for directions.
Side note 2: You like the pedestal bowl? It’s made from one of those plastic pumpkin head trick-or-treat buckets they sell everywhere. Click here to see how it was made two years ago.

I love a generously sized tablecloth, but the sheet was just too big. As long as I was tearing off the excess, I decided to make napkins from the scraps.
Note, I said tear.
Just snip an inch then yank the fabric apart on a straight line– if the fibers are natural they will leave a nice frayed looking raw edge. You might have to pull a few loose threads, but it beats hemming all those edges. Granted, if I was planning on using these things more than a couple times a year, I would probably hem the edges. But I’m happy as is, raw edges and all. If William Sonoma can sell raw edge napkins for $8.00 a pop, so can I.
I love folding napkins. It’s my secret talent.
Oops. I guess it’s not so secret anymore.

For the Halloween table, I set out some wax paper spider web luminarias.
My favorite expression; Candles are like panty hose for your house, they make everything look good.
Happy Halloween!
*Note: I wrote this post as part of a paid campaign for RIT Dye and Blueprint Social. All opinions are my own. I have been buying Rit dye in the laundry isle of my local grocery store for 20+ years and have always been pleased with the results. If you have never tried fabric dye at home, I suggest you grab some rubber gloves and a bottle (or box) or Rit. Prepare to be amazed! For more information about RIT Dye, check them out on facebook, twitter, and pinterest.
I know it’s months later but I just saw it and I LOVE the whole idea. Thanks.
I tried making this tie-dye tablecloth this weekend and it turned out great! I fell in love with this idea the second I saw it. It is a beautiful dinner or lunch setting arrangement. I love tie-dye but would never think to do a tablecloth. Thanks for the great idea.
I have several tablecloths with a little yellow spot here and there, so this is perfect!!! Thank you so much! Lord knows I don`t need anymore cleaning cloths!
Am gonna do it. Love the tablecloth!