Aren’t these pretty? Cheap and easy too. There is something truly magical about candlelight reflecting off real gold. It illuminates with a different, special sort of radiant warmth. Magic like. If you have ever attended a candlelight mass at an old Gothic cathedral, you have seen the magic in action, all shimmery and golden. It’s stunning.


Switching gears from mass to menorahs….Years ago, I fell in love with a DIY menorah I saw in a magazine, assembled from candles in mercury glass votives. I rushed out to the store to pick up the votives, but then saw the price tag….
Seriously, who pays $24 for four sparkly shot glasses?
The overpriced store in question (I won’t be rude and tell you the full name, but it started with Pottery and ended with Barn) also had some lovely golden votives and vases scattered around a harvest table. They interspersed berries and bark and earthenware style ceramics…a really lovely spread, I must say. Decided I liked the gold votives more than the mercury glass and set on home to make them myself.
Two hours later, my golden modern day menorah was born.
 |
| You like my pink elephant menorah? More on her next week. I have lots of menorahs to share. Told you I like candlelight 🙂 |

People can be very intimidated by working with real gold leaf (that’s’ right, it’s REAL GOLD)…but once you realize how friendly and inexpensive it can be, you might just get addicted. You can use this same technique to gild frames, vases, sculptures, doorknobs, garden gnomes, cat beds…
This is a great first-time project for those who have never tried it before. Messy bits and imperfections only add to the charm.
Materials
- 3 glass mason jars (drinking glasses or a vase would also work just fine)
- 6 sheets of gold leaf (quality and cost varies…I can pick up a packet of 25 sheets at the art store for $6)
- Gold leaf adhesive
- Small paint brush
- Votive candles
Tip: If this is your first time and you will use it more than once, buy a kit that includes gold leaf, adhesive and varnish. They usually run around $10, depending on leaf quality.
Tip: Gold leaf is very delicate. You will need to do this is a room without any wind/air flow. I would avoid working around small kids, at least the first time you try it.
Tip: If you find that the gold leaf shreds when you touch it, that’s a sign your hands are too moist. Try picking it up with a paint brush, or put on cotton gloves.
Tip: You still a scaridy cat? See this video for a quick and easy demonstration. Don’t be intimidated!
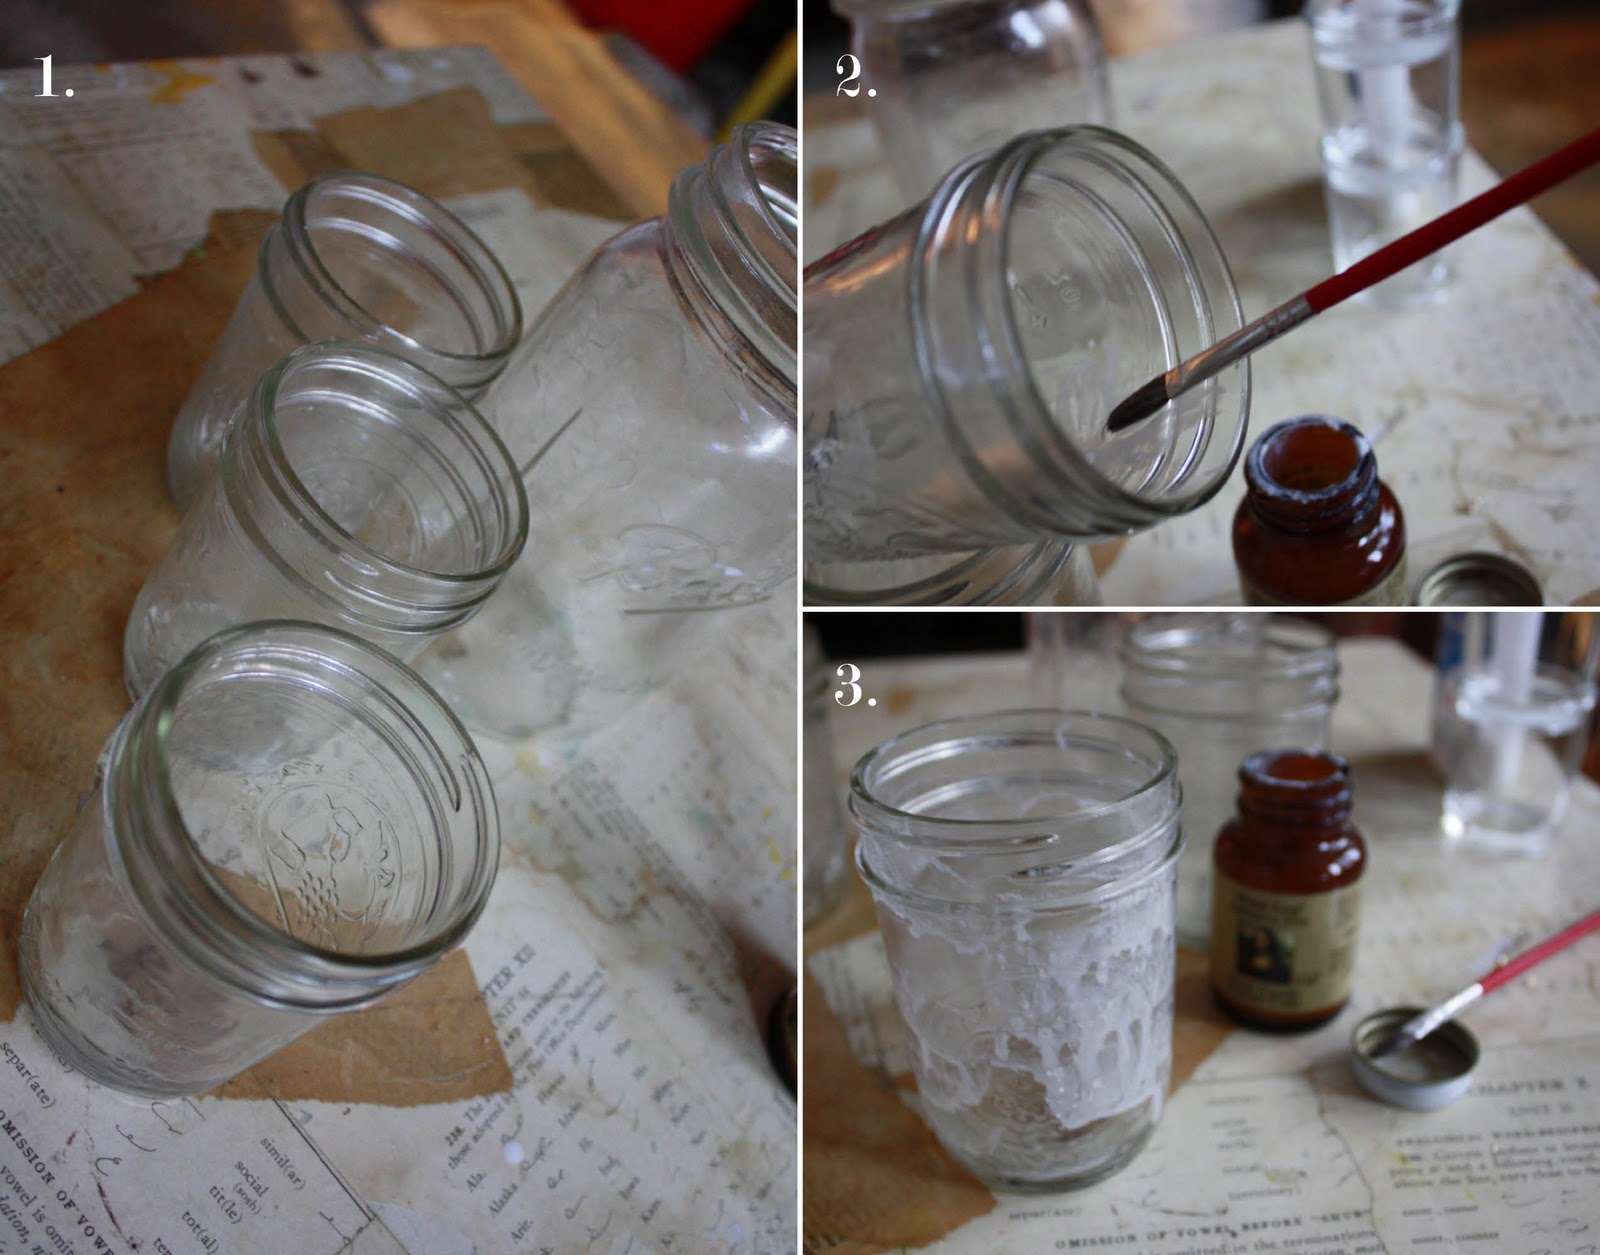
1. Line up your jars or glasses. Make sure they are absolutly clean.
2. Apply gold leaf adhesive to the inside of the jar.
3. Directions vary for every brand, but I like to do a very thin layer of glue all over, then go back to add more, letting it drip and dribble in places. This will help create a scattered/uneven coat. That’s right, messiness counts 🙂

4. Follow adhesive directions, most will require the glue to dry for a while before proceeding further.
5.Tear 6 sheets of gold leaf AND the tissue paper away from the larger packet.
6. Smaller sheets are easier to work with, so I cut my sheets into quarters. You do what works for you.
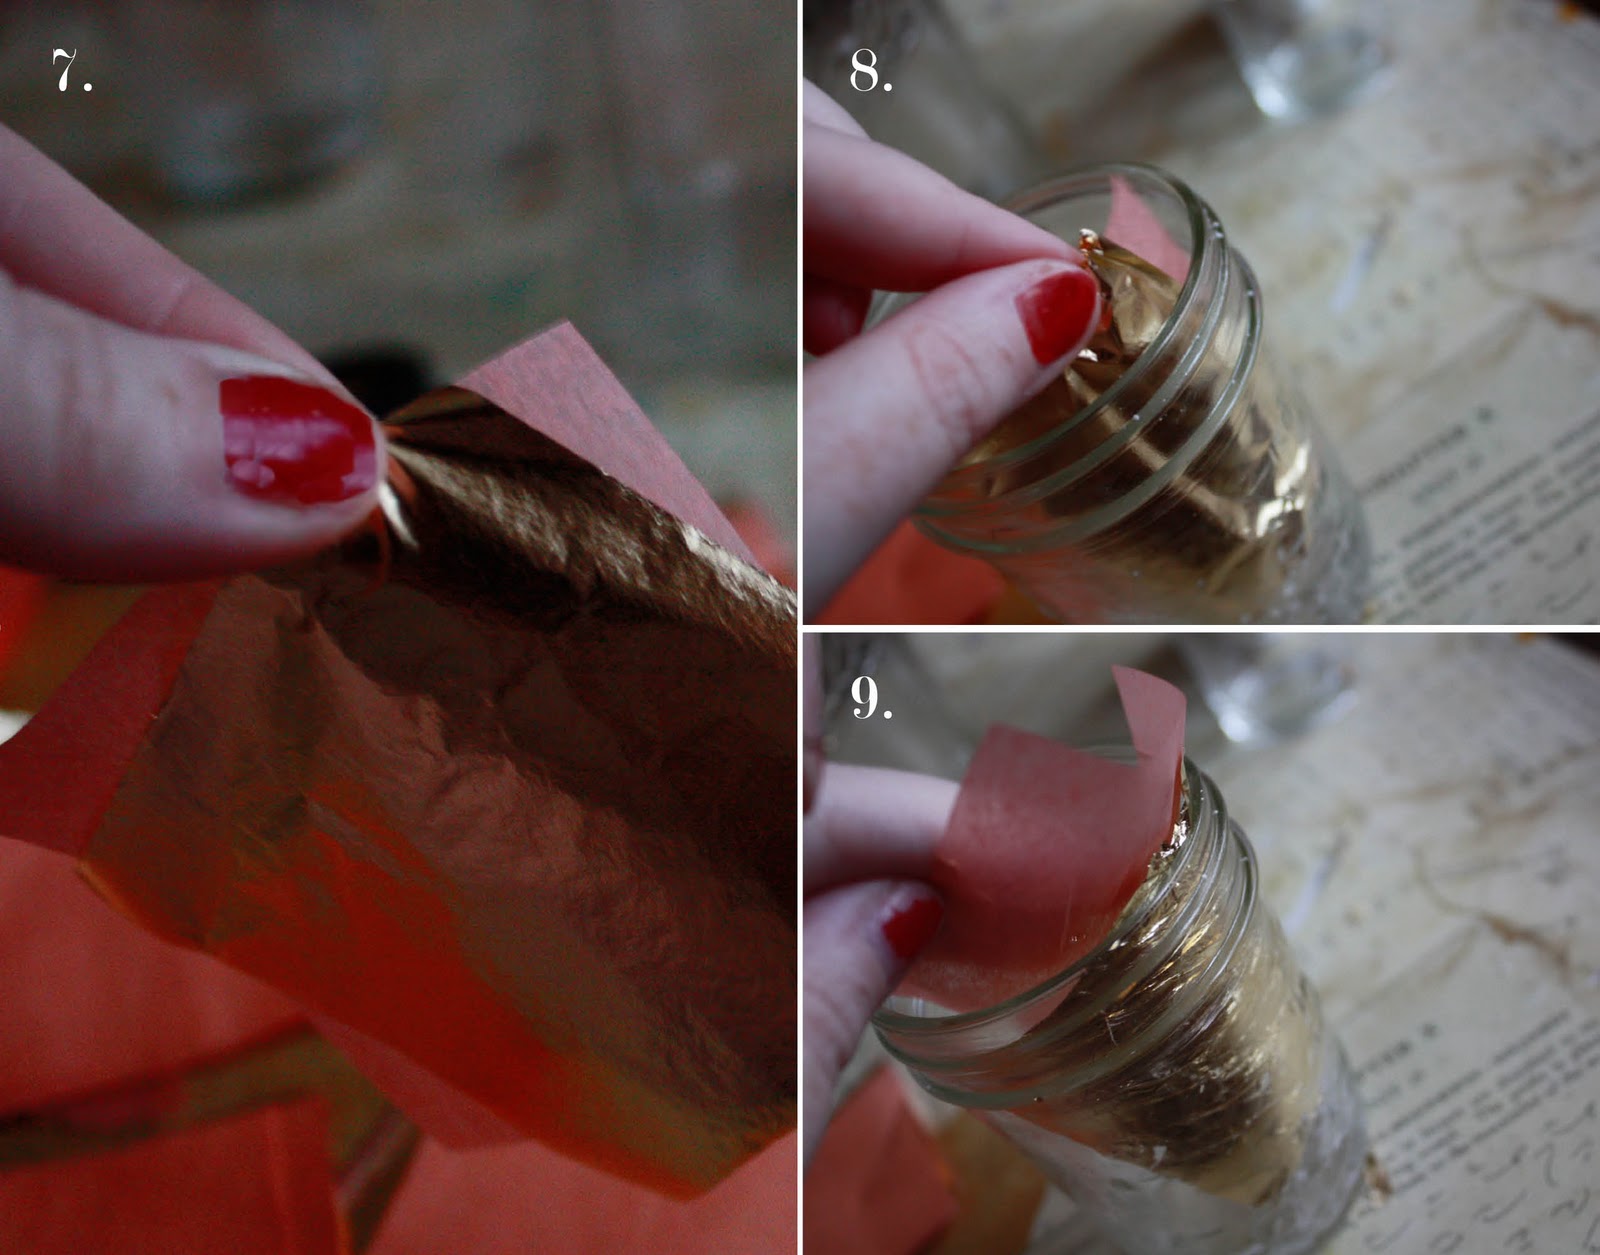
7. Delicatly lift up one piece of gold leaf and tissue. Chances are it will still to the tissue and you won’t have to touch the gold much at all. If your hands are sweaty or there is a lot of moisture in teh air, wear cotton gloves or clap your hands with baby powder.
8.Insert the piece inside the jar, using the tissue to press the gold to the glass. move it around for a minute to make sure the gold sticks.
9. Remove tissue.

10. Repeat the process until you have covered the jar. Or not. You could just do one patch and that would be neato. You could just do the brim of the glass. Or not. Y’all decide.
11. Remove all the scraggler bits by inserting a rag or washcloth inside teh jar and swirling it around. This should wipe away most of the excess gold crumbs. If you decide there is too much gold, you can go in and scratch it away.
12. Gold crumbs can get kinda messy, so you may want to do step 11 outside, but don’t sweat it too much. Genuine gold crumbs are as dangerous as cracker crumbs. Except, somehow gold crumbs are a lot more fun to talk about.
13. Ta Da! You is a done one. Feel free to varnish the inside, just make sure, if you are making votives, that the varnish is non flammable. A little diluted Mod Podge would do the trick. You could even tint the Mod Podge a color and make it look like colored glass.
Folks, the fun never ends.


I think you mean “gilded,” unless the jars are part of a guild. I guess they are kind of an association in a particular trade.
Usually comments like this are mean, but that was cute 😉
Geez-o-pete Tanie, you are right! Noted and adjusted. Thanks for pointing that out.
The things we learned in school…so quickly forgotten 🙂
tee hee, I would have missed that one too ;-}
Love this project. Lets hear more about that pink elephant.
These are LOVELY! Thanks for the inspiration, yet again, Peaches!
So elegant. Very design sponge. I can see these on my turkey day table with a burlap table runner and some berry napkin rings. lovely lovely.
These are so pretty. I’ve always wanted to use gold leaf, now I won’t be so intimidated. Great tutorial!
that tutorial is awesome Peaches. I love the pacing and the flow of it (not to mention that your creations are golden heavenly delights from paradise)! Ya, I must say that i learn so much about so many things when i visit here (it’s one of my favourite places). Some of the things that I learned today (aside from how to make golden heavenly delights from paradise, which is why i came in the first place) are: (1) not editing the life out of photos (as i do) if you know what i mean. it’s beautiful to see the details of your surroundings, where you work and live. it really makes us “know” you a little more. which is excellent. (2) taking your time to explain the steps. I have tried to be really brief and to the point with my explanations but that may have the effect of seeming abrupt, and once again sucks the reality and warmth out of my tutorials.
life is about learning, ain’t it? thanks for being a great teacher (in more ways than one)!!!!
woah long comment… ok done.
Michele, you always leave THE BEST and most thoughtful comments! I’m glad you picked up on my, um, lack of editing out the surroundings on this one. My living room is the only place that gets decent natural light for photographing, and since it’s wall to wall books and photos, finding a spot with a ‘clean’ background is just about impossible. Usually I have to blur like crazy…I let it go on this project but I’m sure thankful I could crop out the empty diet coke can and giant pile of laundry in the corner!
Kathryn –That is a real compliment. I just love design sponge. I’m going to send a link over their way right now 🙂
Leslie/Party Mom–Don’t be scared!
I think I just threw away a lot of jam jars!!…But, couldn’t I try this with all my old florist vases? If I wanted to use them for flowers, I would have to slip in a glass to hold the water. I saw a DIY recently where someone painted all those leftover vases white. I think from the inside. They looked nice. I want a complete menorah post. I also want to hear about your grandmother. I still haven’t finished my garbage flowers, I am making columbine ones to stick in the meadow of my fancy mountain gated community. Can you make some Christmas themed ones? I hate poinsettias. Thanks, Ann
Nutbird, youre back! You always have something good to say, too 🙂
Yes, yes, menorahs and grandmas and holiday blooms are in the works. I’m not the biggest poinsettia fan either, although I think the white ones are nifty, and the shape is perfect for paper/ coffee filters so they’ll be around too. I’m intrigued by your columbines…. Send pictures sometime!
Ooh, pretty! I’m a little in love with that menorah…don’t be surprised if you see something similar gracing my blog soon!
What gorgeous display! From just jam jars!?! Nothing is ‘just’ anything after you get your artistic little hands on it. I also love the photos, mwah! Pair-feck-shun.
Great idea, I want to make some. I’m glad I’m not the only one who goes to upscale stores to garner ideas that I can create at home.
Ohhh! These are just so pretty! I’m going to make them up for the holidays! p.s. I have some big PB colored mercury glass votives but waited till they were 50% off-haha!
xo Mary Jo
Hoping you will have a cool wreath tutorial soon. I’m still undecided about what to do.
Oh how pretty! I love gold this time of year. Thanks so much, I’ll be linking.
Gorgeous! Thanks for linking up on Craft Schooling Sunday! Especially love the rosemary accents and using some as vases. I’m going to be guest posting at Curbly.com for a few days about Chanukah…..I’ll be sure to include you! xoxoxoSara
Your menorah is so pretty! I love that this is so different from anything I’ve ever seen!
Looks great indeed! Will keep this idea in my mind. Thanks for sharing.
It can be difficult to find neat Chanukah decorating ideas. I LOVE your menorah creation—so clever! Thanks a bunch.
Hi, I found your blog through pinterest while searching diy gold votives. I am thinking of doing a bunch of candle holders for my wedding and I wanted ask you if you used Modge Podge to seal them, or the regular varnish that comes with the gold leaf and adhesive?
If you used Modge Podge did you use it as an adhesive as well?
Thanks!
No, I didn’t seal with anything but if you wanted them for the long haul it would probably be a good idea!
saw this just on time! headed to the craft store today(2+hr drive)
was just going to browse around for an idea Now I well look like I know what I’m doing THANKS TO YOU& with a little luck have some beautiful gifts.
Good day very cool site!! Man .. Beautiful .. Wonderful ..
I’ll bookmark your site and take the feeds also?
I’m satisfied to find a lot of useful info right here
in the put up, we need work out extra techniques in this regard, thanks for sharing.
. . . . .