As mentioned earlier, these garbage flowers festoon the bars on the front windows of my basement apartment. At the risk of tooting my own horn (toot! toot!) I just love how these flowers came out; they look awful nifty, cost $2 in materials, start conversations with the neighbors, and most important–they make me happy every time I walk through my front door. Beat that!
Minus a $2 bolt of 20gage wire, these were made entirely from materials I had around the house or was planning to discard. If you are thinking about making garbage flowers, I would challenge you to do the same –I promise you’ll be impressed with the results and proud of your resourcefulness!
People making stuff out of nothing is as beautiful as it gets, at least in my book. If you gravitate towards this type of work you have got to check out the Magpie Art Collective in South Africa for some Dang Serious Inspiration.
Instructions
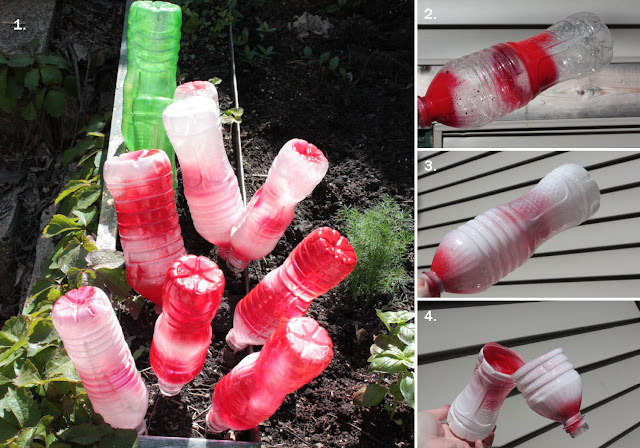
1. Get yourself a heap of plastic bottles, some spray paint*, 10” pieces of wire or sturdy pipe cleaners, and if you like, put some old chop sticks in the dirt to use as a drying rack later on.
2. For a two-tone effect, paint the ends of your bottle and band in the middle.
3. Paint the entire bottle in a second color. This will be the background.
4. After it dries, cut in half. Kitchen shears were the best cutting tool for me, but you can also use an Exacto knife or manicure scissors to do some kickass fine detail work like this dude.
*A note on paint: I used spray paint because I like the gradient effect and happened to have some open cans around. However, spray paint is highly toxic and should never be used indoors, around children, or children-with-fur who have extra sensitive noses. It’s also mighty bad for the environment so try to find the least harmful option available (Krylon’s water base latex for around $4.00 a can isn’t too shabby). Most any acrylic/brush paint will stick to the bottle but you’ll need to test durability if your flowers will need to last outside in a rainstorm. These look wonderful and appear to be done with kid’s tempra paint. Y’all will have to decide for yourself.
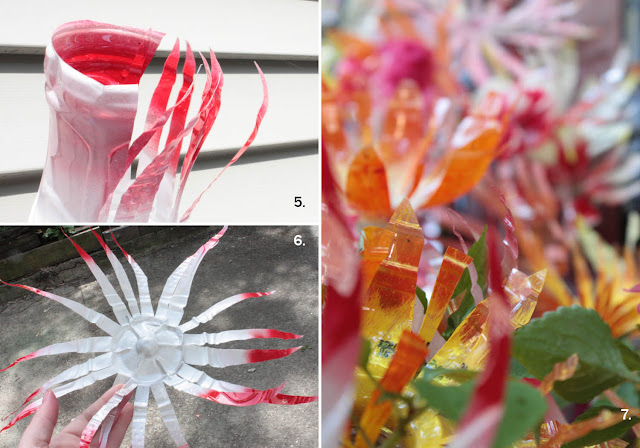
5. Take the bottom half of the bottle and make a bunch of vertical slices along the bottle walls. Cutting lazy curves and pointy ends gives some nice results.
6. Spread it out flat. Cool, huh? Poke two holes in the center if you plan to wire it to s a stem.
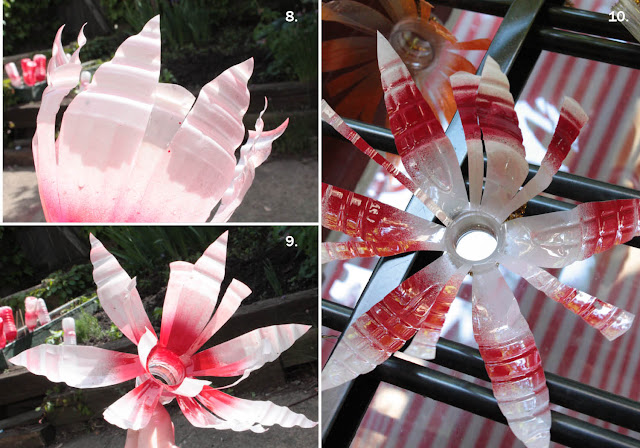
7. The spikey flowers like this may not look the greatest individually, but in mass they are really striking. We took a few of these and added them to a simple potted plant as a gift for a friend’s gallery opening. It sure looked neato.
8. Take the top half of the flower and cut toward the opening, alternating small square strips, with larger rounded ones. Experiment and find your own pattern.
9. Finish by pulling back the larger petals, while the smaller petals remain standing up. Ends up similar to a daffodil.
10. Aww, aren’t they sweet?
Did your Brownie troop make these out of old shopping bags? Mine sure did. These are so easy I feel redundant just typing the instructions.
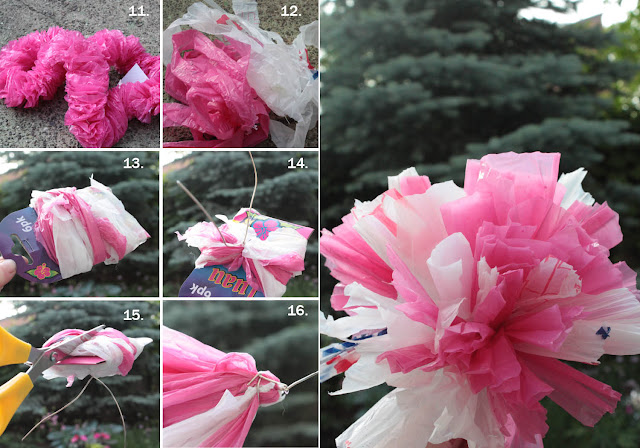
11. You need lots of plastic strips about 1″ wide. Best source for this is cut-up plastic grocery bags. I wanted some extra color so I bought a six-pack of plastic Hawaiian luau leis from the party section at my local dollar store. Snip the inner string and they will fall apart into strips.
12. Size is up to you, but to make a dense flower the size of my hand I needed about 3 yards of 1” plastic strips.
13. Wind your ribbon around a 3”paddle (just a piece of cardboard is fine. I used the tag from the dollar store).
14. On one side of the paddle, use a 10” piece of wire (or pipe cleaner) and tightly bind together all those strands you just wound up. Twist. Twist as hard as you can without breaking the wire and you will end up with a wonderfully poofy flower in the end.
15. On the reverse side, snip the ribbons right down the middle and bundle all the loose ‘petals’ together.
16. About a half inch up, wrap one length of the wire around the bulk of the plastic as though you were making a tassel or a broom.
17. There you have it. Wouldn’t one of these look dandy on top of a box gift wrapped in brown paper or newsprint? Especially if the flowers was made out of dirty brown bags like the ones from my grocery store. I like to keep these tied in random spots around the house because they make me so happy.
 Variations
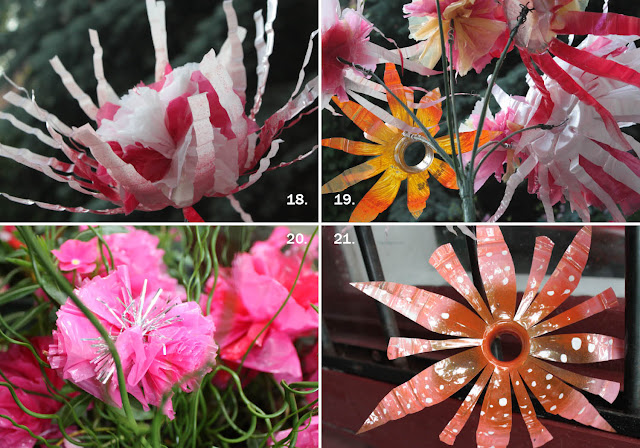
18. Double down! Layer the Bag Lady flower right in the middle of a Spikey Flower.
19. Make an easy bouquet by wiring them to the stems of a faux flower bunch from the dollar store. I just pull off the silk flower heads (easy) for other projects, and keep the plastic stems. They are surprisingly sturdy.
20. Add some glitter. Just before you wind the ribbon around the paddle, add a little bit of discarded X-mas tinsel.
21. You could go crazy painting the bottles before you cut them, but I also found just a few white dots before spray painting was nice too. Lily like, if you ask me.

so awesome…i love them!!!
How are the centers shown in 10 and 21 done?
I can see why your neighbors love looking at these! And thank you for sharing the Magpie link. It’s full of tons of creative ideas. My head is just bursting.
Peaches I am so glad you shared this particular craft with us. I have been trying to find a craft for my used water bottles and this will give an added touch to my garden until my other flowers bloom.
Believe me when I say I already have all the necessary supplies. I even have some leis which were going to be used in a tag team race a couple of years ago. LOL
Oh WOW! LOVE!!! YEAH! These are all wonderful!
Fantastic work, really bright and fun! We’ll be giving these a try! 🙂
AMAZING! Can’t wait to teach kids how to make these on earth day!
I can’t wait to get started on these! I don’t get out much so am always excited to find something that uses things I have around the house or can get easily. Gramma Patti
these are the prettest flowers Ive ever see made I will be makeing some. thank you for the lessens.