Some women have a thing for shoes – I have a thing for cheap art. Thrift store art. I buy anything in a nice looking frame. If it’s under $5 and it’s in a nice frame, it comes home with me. This is how I end up with a basement that looks like the island of misfit frames. They just sit there looking at me all, FILL ME NOW! HANG ME UP! And I’m all, Y’all. Chill.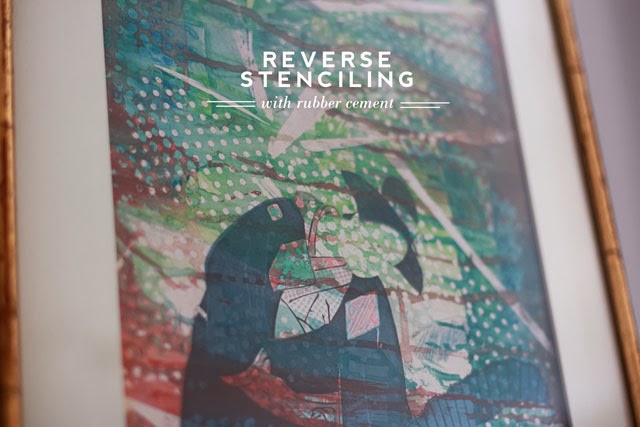
I know there are plenty of crafty folks who would take the frame and paint some abstract art piece just to match a sofa, and that’s cool, but I think it’s nice to honor the integrity of the original piece. Find a way to layer new and old, straight and squiggled, tradition and non-conformity. Can you dig that?
Plus it’s just a really fun way to kill and afternoon and break out the stencils. When was the last time you hung out with stencils anyway?
–That’s right. Too damn long.

That geisha lady didn’t know what hit her. Last time she was hanging on a wall it was in some granny dinning room with linen napkins and a china cabinet….next thing she woke up in crazy town with a glittered giraffe and a chandelier of disco balls.
The best part of this technique is, you can’t mess this up. No really. You can’t. You mess it up, just go and mess it up more until you get tired. Then slap some gold on there and call it a day. Bam.
AND! You don’t need much to get on the party train…
Materials:
- One old piece of thrift store art (removed from frame)
- Stencil (this polka dot one courtesy of Mod Podge Rocks – check out her new line)
- Rubber cement and rubber cement eraser (fingers will work if needed)
- Watercolors
- Brush/ water
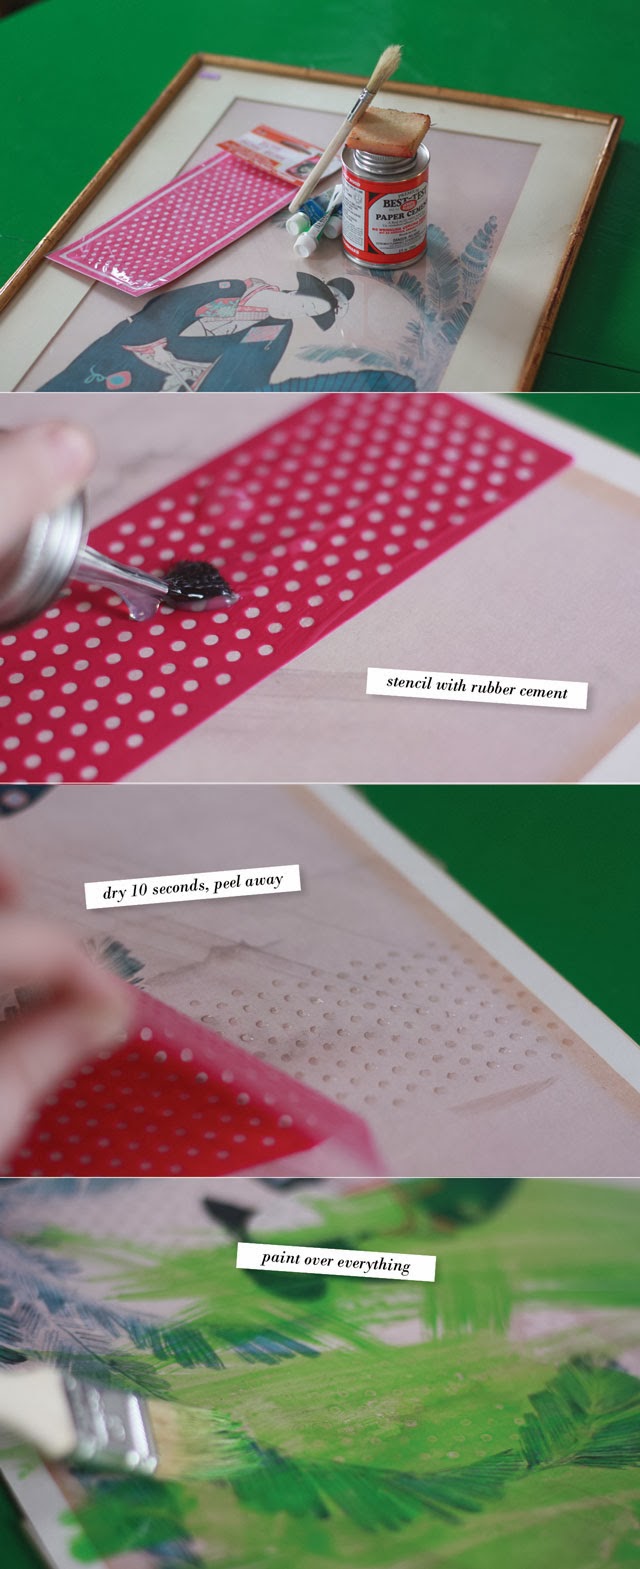
1. Lay your stencil randomly on the surface of the artwork and brush on the rubber cement (same as you would paint). Wait a few seconds and peel away the stencil. Repeat as you see fit, covering the surface of the art. Or not. You could do a little, you could do a lot. You are the decision maker here. Exciting!
2. After all the rubber cement is dry (heavy bits may take a minute or two) paint the entire canvas with a thin layer of watercolor paint (acrylic works too — just not oil based paint). I like watercolor because I can layer a few different colors then tilt the canvas so it gets these nifty drip marks, but that’s your call. You do you.
3. When the paint is 100% dry (not even a teensy bit damp – 100% dry or it’ll rip) rub the eraser over any area that has been stenciled and watch the magic unfurl!
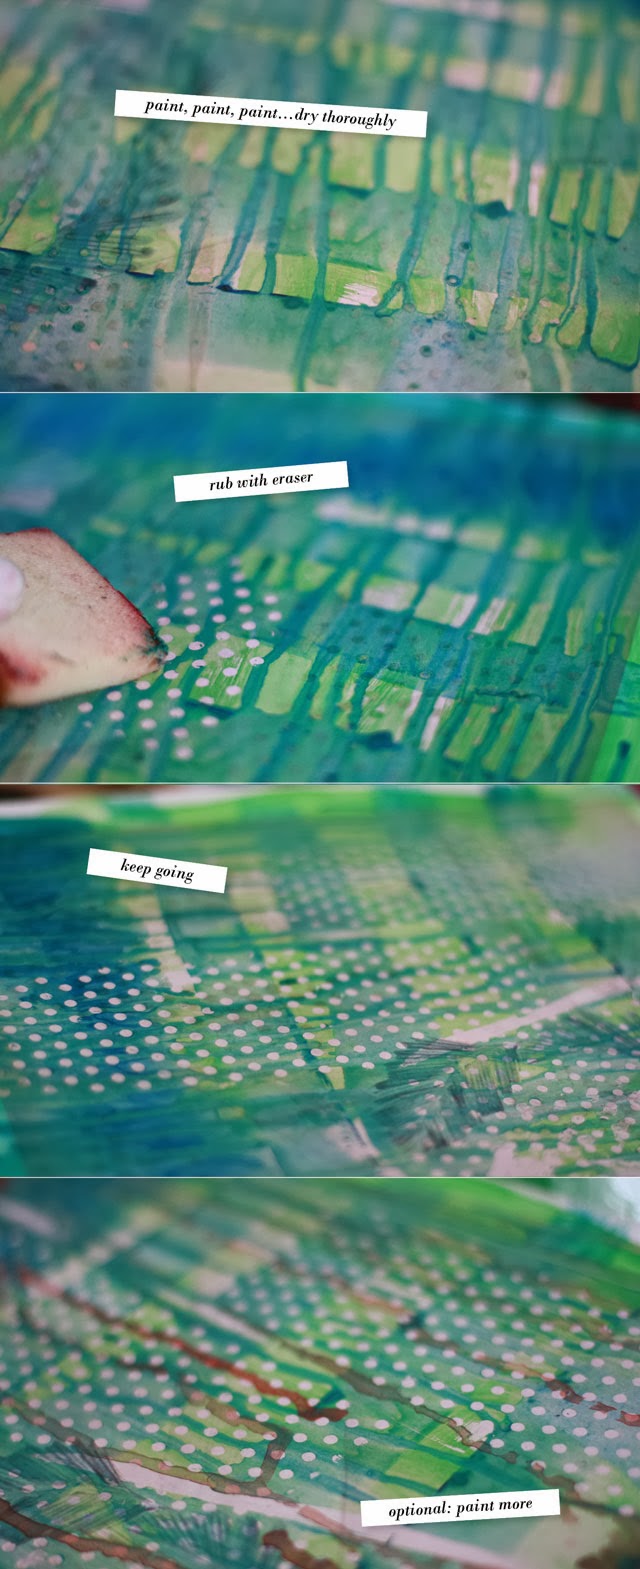
Areas covered with the rubber cement will remain unpainted, revealing a pattern of old, unexposed art peeing through the new layer of paint. Yeah. It’s pretty rad.

Pro Tip: Look for artwork on porous paper. Nothing fancy, but gloss coated paper will probably not take to paint as well. Look for older, more absorbent paper.
Pro tip: When you are all done, don’t try to wash the rubber cement off the stencil, just let it dry then rub it off with your fingers. It’ll look like boogers and your hands will look all zombie like, but that’s half the fun!
Disclosure: The stencil featured in this project is came to me courtesy of the designer, my pal Amy at Mod Podge Rocks. She just launched a whole line of nifty things at Michael’s. Because she’s cool like that. I was gawking at them at last weekend — check ’em out!
So, so cool! Love the reverse stenciling technique 🙂
Very cool! I’ll have to try that one a thrift store work of art just waiting for embellishment. 😉
It came out better than I expected. I’m having a hard time looking at my other thrift store artworks without wanting to break out the rubber cement!
can’t decide if i’m more excited for new art or zombie hands! huzzah!
Zombie hands. Definitely, zombie hands 🙂
I love this. You sure did add interest to this geisha. This is exciting due to many possibilities.
That is gorgeous! I love that you prefer to honor and enhance the original piece. I have never heard of using rubber cement this way – thanks for the tantalizing tip! Also, who but you would think to do this amazing thing with the polka dot stencil? No one, that’s who.
LOVE this! this is so cool, and an awesome way to show some love to thrift store art. i definitely need to check out my local thrift stores, AND pick up some of those stencils. 🙂
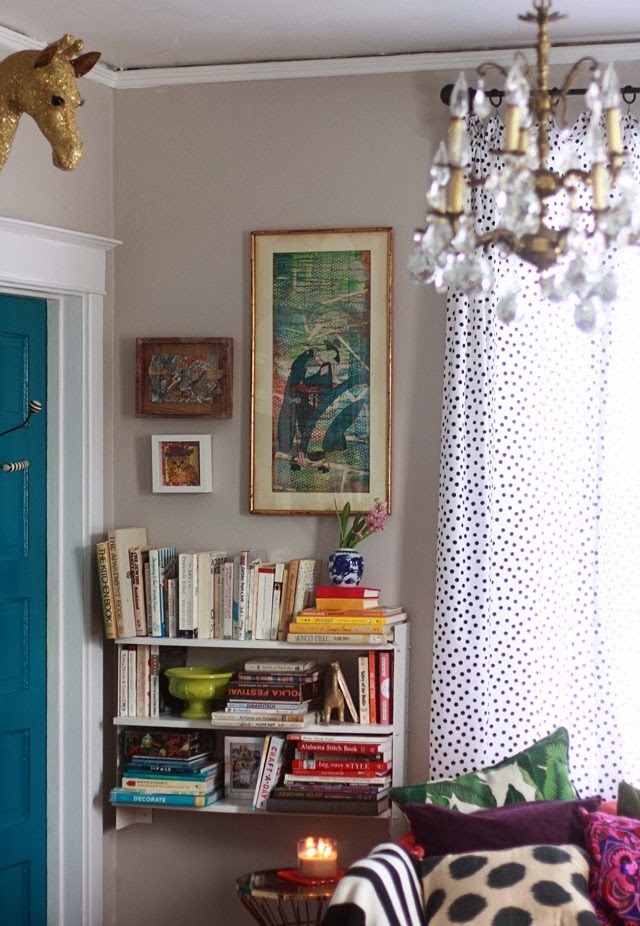
That is so beautiful and inspiring! Just the way you have everything displayed, even your cool books and other pictures next to this one. Love it. Thank you, Aunt Peaches- you continue to inspire!
EEK this is genus!
Love your new-old work of art! Old, cheap frames are fantabulous. My old eBayin’ days provided us with plenty of them. Last summer, I went on a painting binge for our newly decorated kids’ basement playroom. I had a BLAST, color-coordinating initials and frames for the five GrandLoves!! And, for the record, those old matts can be painted or spray painted, too. They turn out GORGEOUS.
Just Color Me!! If you’d like to see:
http://nickicarm.blogspot.com/2013/09/picassos-on-rise.html
so, so, so cool! if only i could find nifty art at my thrifts…always searching for it and the two i have scored are of the big-eyed Keane style variety and I just can’t stencil over those! thank you for sharing!
Dang, I was doing searches on reverse stenciling and found this. Awesome! What’s especially cool about it is it still has a Japanese feel, as thought it was done it with wood blocks. So colorful and more interesting than the original. Love it! Of course, your beautiful room makes all the difference 🙂
You’re a quirky one and I like that. Going to follow your blog.
Thank you times millions for the recycled thrift shop art inspiration! What luck to find you after merely asking Google a rubber cement question. Looking forward to exploring the rest of your posts. Inspiration is my drug of choice and I am sincerely grateful for folks like you who share their ideas.