By conservative estimate, I have decorated around 300 Christmas trees, which is a lot less impressive than it sounds. Most of them were designed to sell something or fill up a lobby. Some were nice, some were not…some were beautiful, but very few of them were ever loved. It’s kinda sad. There is a part of me that will always see a Christmas tree as a commodity, while another part will always see them as a canvas for pattern, love, and sentiment. Put those two attitudes together in a swirling soup of glitter and red velvet and you have a pretty decent understanding of what my brain looks like January through October. Sometime in mid-November, someone turns on a Michael Buble Christmas album and the whole soup explodes all over my living room, which is where I currently sit and type this blog post. It’s a mess. Honestly, it’s probably best you are not here right now. But, sometimes I clear off the floor enough to see the carpet and take photos, which brings us to the crux of this blog post: decorating Christmas trees.
As I mentioned a couple weeks ago, Michael’s was kind enough to provide me with a 7′ pre-lit tree as the base, and gave me a gift card to see what I could do with their merchandise. For all the years I got paid to decorate trees, not once did anyone ever say “here is some money – go for it.”….so, yeah, at first I went crazy. Then I thought it would be a lot more interesting to set myself a challenge. Could I create a “designer” looking tree for under $100? Could I hold back my own affinity for rhinestones and pom poms long enough to create a tree that would look good in anyone’s home? Could I be…tasteful?
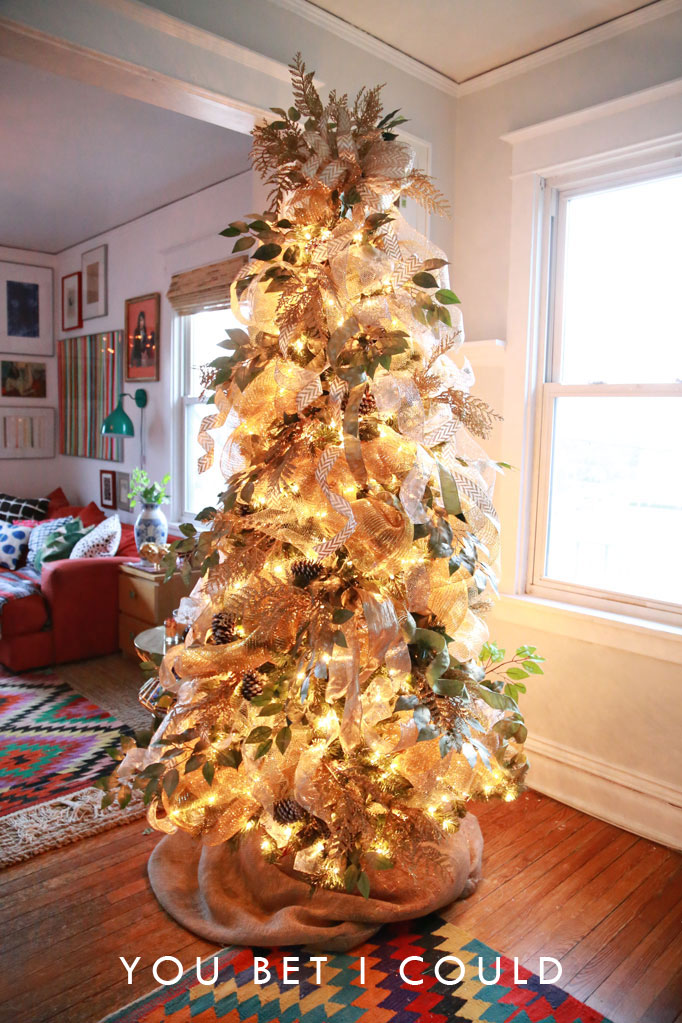
So get ready. This is going one a honker of a long blog post. Will be of zero interest to anyone who is happy with their current Christmas tree situation. But if you want to add some oomph, without spending a lot of cheese, get ready.
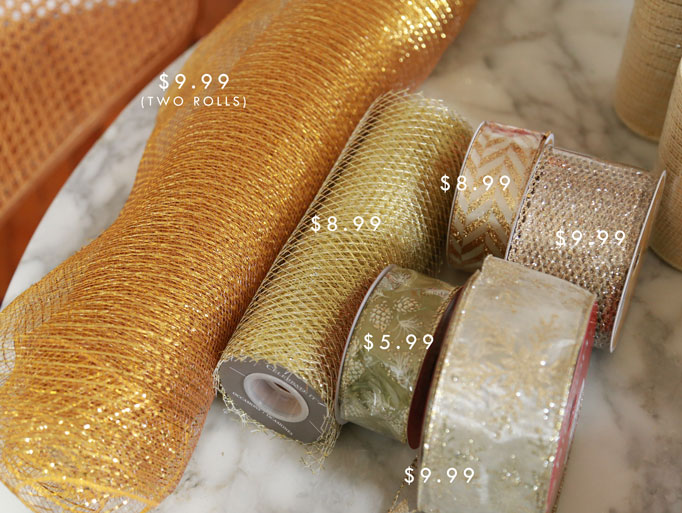
- Trimmings; 2 rolls of 21″ gold deco mesh, 1 roll of gold netting, 4 rolls of wired ribbon. Total $63.93
- Pinecones (free to me but let’s pretend you bought the scented ones for $2.99) + Glitter ($1.99) + Tacky Glue ($1.19) = $6.17
- Pipecleaners ($2.99)
- Greenery/”Frosting”; gold glitter pine spray $9.99 + 5 ficus branches (5 x $1.79 =$8.95) spray painted gold ($7.49). Total =$26.43
GRAND TOTAL $99.52
Annnnd, get this! Technically, I actually spent a lot less than that because most of this stuff was considered “holiday merchandise” so it was 40% off AND I bought it with a 25% off coupon (including some sale items – love it when that happens!). Granted, I’m not estimating sales tax here because that varies greatly, or shipping (free if you order more than $50), or the 2 yards of burlap around the bottom (came from my garage but they sell it at Michaels too)…but I think you get the bottom line. You can decorate a fantastic, designer quality tree for under $100 when you shop smart.
The great thing about this style or tree decor is that it looks good on it’s own, or as a base for a collection of family ornaments. Besides the tree with the lights, there are 3 layers going on here. It looks like a lot more, but trust me, no, it’s just three. And all of them are very easy. Let’s break it down!
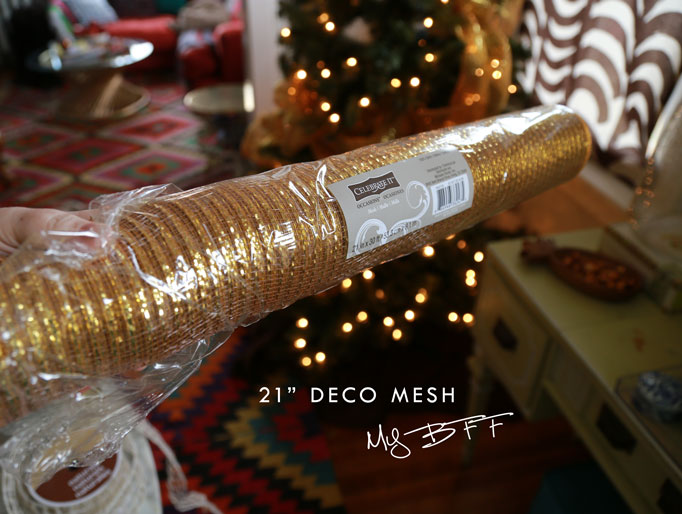
If you have never worked with deco mesh, don’t worry, it won’t bite. However, it will look cheap and gaudy if you use it in small quantities, so whatever you do, once you figure out what you need for your tree, double it. For me, that meant 2 rolls of gold mesh, 21” wide, $9.99 each. There are some great videos on youtube on how to work with mesh, but for me, my method goes like this: lay out the whole long role (this probably requires the use of an empty hallway) then every yard or so, take a pipecleaner and bunch up a tuffet.
Get all your tuffets twisted off, then start adding it to the top of the tree, tucking it in every couple of feet, letting it tumble down in no specific order. Not vertical, not diagonal, just a lopsided zig zag from top to bottom, and if you have extra at the bottom, just zag it back up (This guy does a great job of illustrating how this works). I used two rolls to cover this 7’ tree, but I didn’t pay much attention to the back – if your tree is especially large or can be seen from all sides, 3 rolls will cover it.
After the decomesh was up, I repeated the general path with this super light gold netting, using the tips of the branches to secure it in place. This step was not necessary but it adds a nice halo effect.
Layer 2: Ribbons
Pattern Mixing
When picking out a variety of tone-on-tone ribbons like this, I like to make sure I hit three things;
1. Something with a clean/modern pattern (in my case, the herringbone stripe (top left))
2. Something with a round/organic pattern (in my case,the green pinecones (top left))
3. Something printed on a sheer background (in my case, the snowflakes (bottom right))
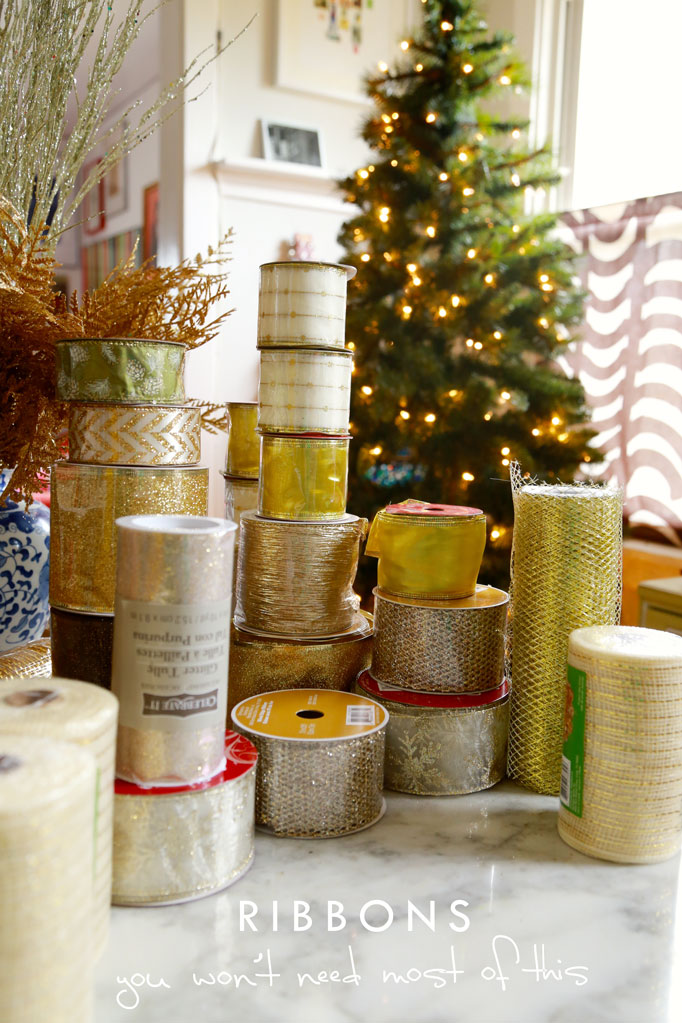
….I’m not saying anyone has to have all three of those things on a tree, I’m saying if you put those things together, they bring out the best in the other when you see them tumbling down the tree. It’s a formula. Peanut butter is good. Jelly is good. But put them together on bread, and BAM. That’s a winner. Pattern mixing is a similar science. Michael’s has aisles of amazing ribbons, so just get something great. It’s not hard!
Two Kinds of Ribbons
There are two kinds of ribbons; wired and not wired. For this project you only want wired. Also, there are two kinds of wired ribbon; ribbon that is made with smooth wire and ribbon that is made with twisted/warped wire. Both will keep their shape when you crimp them, but twisted wire will never give you the loose, tumbling effect here. I’m not sure why that is, but it is, and you’ll save yourself the headache if you take a moment to pull back the plastic on the ribbon before you buy it. Feel the wire. Do you feel notches or kinks? Nope? Great. That’s the kind you want. If you feel notches, leave it be, or buy it for wrapping presents or something. For the record, I have never purchased anything but smooth wired ribbon from Michael’s. You are more likely to find the twisted stuff it in a dollar store or big box super store.
Buncha Ribbons
I take 3 to 4 different patterns and textures, cut a yardish of each, then twist off in the center with a pipe cleaner, being sure to stagger the lengths. Then I use the pipe cleaner to hook into the tree and let the ribbons fall all around. I’ll use the branches to fan them out, and maybe even pinch a loop off on an especially long streamer, but mostly I’m just letting them spread. You can cover a lot of real estate with less than 10 yards of good ribbon.
 Curling Ribbons
Y’all don’t know this, but I was really good at curling hair in high school. That’s not me bragging, it’s a legit fact. Pass my driving test? NOPE. Curl hair? LIKE A BOSS.
I don’t even own a curling iron any more, but some skills stay with you. I’m going to include a photo of my high school graduation to demonstrate my master level mid-90s curling iron skills (and total lack of eyebrows- I shake my fist at you, Drew Barrymore!). Not only could I curl hair, I could curl it around a heinous hat. If that doesn’t deserve props, I don’t know what does.
PS: That’s my cousin John on the left. We were born two weeks apart. He looked like Harry Potter before there was a Harry Potter, and he’s probably going to be ticked I included him in the photo, but he’ll understand because my hair looked really good here. There are some things family never questions.
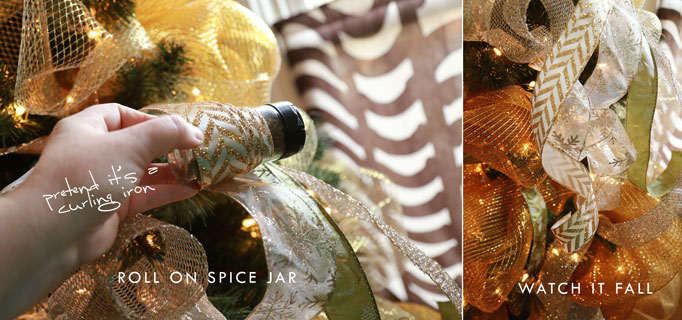
Where was I? Oh! Ribbon. So. If you have one, an unplugged curling iron works great. You just run the clamped barrel down the length of the hair ribbon and then roll up. Since I don’t own a curling iron anymore, I just use a glass spice jar — it works great. The wire in the ribbon will hold for years so long as you don’t yank on it. I used to know a florist lady who, like a magical unicorn, could create soft tendrils of big fat ribbons with her fingers. Alas, I never picked up that skill, but you can try. Maybe your fingers are more magical than mine.
Layer 3: Greenery, aka “Frosting”
In my opinion, this last step is what what makes a tree. If you spend time or money on one thing to improve your tree, it would be this step, which I like to call “frosting.” Michael’s sells some beautiful floral sprays, many of them glittered thicker than a roller rink. You can buy lots of small ones and poke them in, but I like to save money by purchasing one BIG one, then breaking it into smaller pieces with a wire cutter — that’s what I did for the golden pine branches you see on the tree. However, the thing that gives this tree a wintery “woodland” feeling is, of all things, ficus branches.

I think these branches are meant to get poked in a trunk like a ficus tree, but I like them for Christmas. They come in a big thing – so I poked them in the dirt, sprayed them with barely a dusting of gold spray paint, then after they dried, I snipped each branch into three smaller pieces. They are easy to twist on to the tips, and their lines capture a lot of airiness that offsets the hefty bulk of the tree. If there was one thing I was to go back and get more of, it would be these branches. They also look awesome in wreaths and garlands. Just about anywhere. If there was one item I wish Michael’s carried (but doesn’t) it would be a gold glitter version of these ficus branches. I’d use them everywhere. I’d wear them in my hair and drive to Sonic for ice cream. Michael’s, can we work on this?!
Well folks. That’s about it! This was probably more than either one of wanted to talk about Christmas tree decorating, but sometimes it’s good to get these things out. Speaking of getting out…this tree is on it’s way out my house this weekend. Getting ready to put up the flamingo tree in its place. Stay tuned. Happy Weekend.
PS: Check out these tree decorating tips and tricks from some of the other Michael’s Makers!






The tree is awesome, particularly for under $100. I have to say, I love the sofa and pillows in the background, so colorful.
Thanks, Cindy!
Thanks Peaches, I, for one am grateful for tree decorating lessons. Every year I have these great plans, but they always seem to lose something (a lot of something actually) in the process. You have given help, and hope to my holiday handicapped self!
There is no such thing as Holiday Handicapped so long as there is glitter on hand. Merry Christmas!
It’s beautiful and tasteful, but I prefer the sparkles and spangles and pink flamingos that only YOU can dream up. Your designs always inspire me to take risks, laugh in the face of “good taste” and go for the pure joy of bold color and creative thinking. I love everything you do, (even when it’s “tasteful”) and look forward to every post. You bring a smile to my day.
Thanks Susan, you are too sweet 🙂 Not to worry — my flamingo tree and another funkadelic tree are on the way soon enough!
Thanks for the tutorial! I am a creative person and am sewing and painting stuff up constantly, but it has never translated over to my very-boring tree. Til now! We have such a basic fake tree, this is going to be amazing! I can’t wait.
I’m very traditional with my Christmas tree, but….I have to say, that this one rocks! Great job and thanks for the tutorial.
Lynn
That tree is knock out gorgeous! I am going to use some of your tips on my tree. Great job.
This is SUCH a dumb question, but do the tuffets get tucked into the tree or do the loops of the tuffets face out?
The loops and tuffets all face out, but the pipe cleaners get tucked deep in the tree (which takes a good bunch of the tuffet along with it). That video I linked does a better job of illustrating this than I do!
What a stunning tree….You did an outstanding job!!
Two questions:
Did you used to live in Hyde Park and now live in Evanston?
It’s hard to tell from the pix— is there any green tree still visible thru all the stuff applied to it?
Love your blog!
I live Evanston – I used to live alllllll over Chicago.
It was easy to see that it was a green tree but I wasn’t trying to highlight the greenery like I would with a natural tree. It’s plastic…I wasn’t looking to show it off if you know what I mean. 🙂