That’s right: The Mantel.
Right there next to the ash tray and the wax grapes and the painting of a Parisian bridge on black velvet: My Flowers. I never felt so special in my life. They stayed there up on that mantel several glorious years, until one winter day in 1987 when Grandnanna discovered “a crazy mustache man with long fingernails and a tambourine!” living in her basement.
Y’all, I’m not even joking. If you have a crawl space, go and check it for people with mustaches right now. You’ll feel better.
Anyway…Mustache Man had been there for months. Totally undetected. Neighbors later reported hearing a tambourine late at night, but by then Grandnanna had taken off her hearing aid and never heard a thing…until one day she ventured down for holiday decorations and found him there in the crawl space, eating pork rinds and reading Kafke (seriously, Kafke?)….so she screamed, he screamed, someone threw an Easter basket, and then Mustache Man went crazier than a blind dog in a meat house, running all over, knocking over furniture, screaming and shaking his tambourine. He grabbed two things before he reached the front door; Grandnanna’s purse and the crystal vase with my yellow flowers. Yeah, in retrospect, I know he grabbed the vase because it looked easy to pawn, but when I heard the story, my ten-year-old ego assumed it was a sign my flowers were in hot demand. Obviously.
To my logic: People who like mustaches + People who like pork rinds + People who like tambourines + People who like Kafka = People who will buy my flowers. Clearly.
An empire was born.
I entertained visions of people across the nation, sitting down on their elegant sofas, eating pork rinds, gently tapping their tambourines in praise of the flowers up there on their mantels. I was going to start a decorative movement! The plan for this craft-tastic empire was simple: get Hallmark to sell them in their stores and offer a free brownie with every purchase. All I needed to start the movement was time, coffee filters, and a whole lot of brownies. Twenty years later, I’m still working on it.
Hallmark: call me.
Y’all: grab your tambourine and join in the movement!


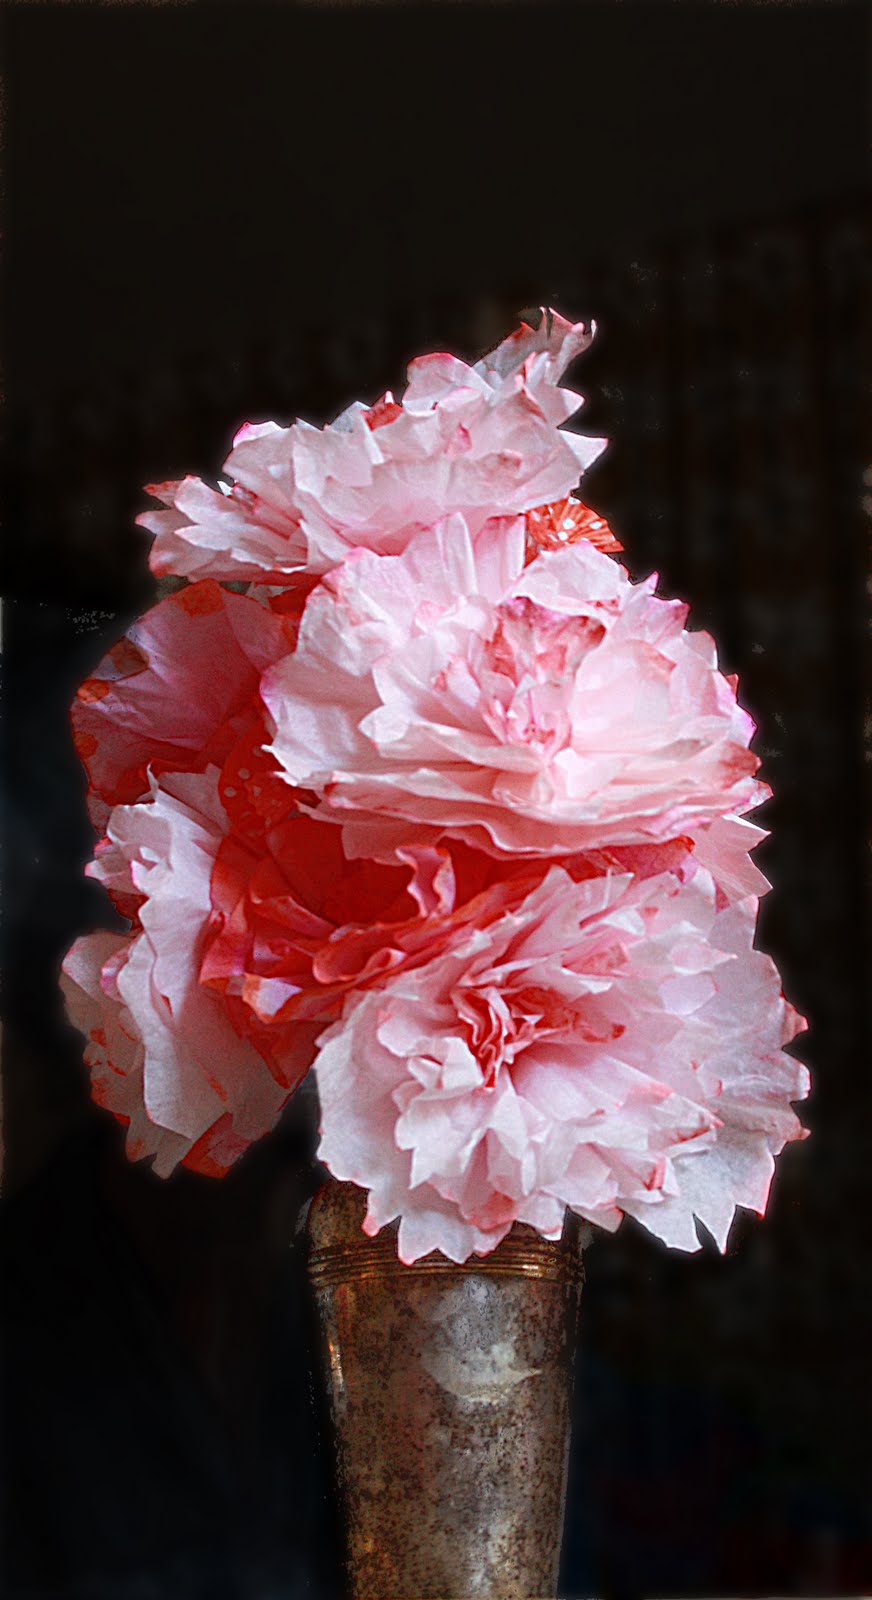
6. From here on in, think of your filters in 3 separate groups
* Tier A, one filter, darkest color
* Tier B, two filters, medium color
* Tier C, three filters, lightest color
7. For a jagged edge like a peony, fold your filters and snip away at the edges. No need for perfection here.
8. Keep them in line!
9. Take Tier A (the darkest filter), scrunch and twist. You’ll want a good inch of twist at the bottom. Notice that the filters stay in place without glue. Magic.
10. Take Tier B (the two medium filters and snip a pea-size hole in the middle.
11. Insert the pointed twist of Tier A inside the tiny-hole of Tier B, and twist it all together. Again, you will want a good inch of twisted stump at the bottom.
12. Yup, repeat the same process with Tier C.
13. Bind with a pipe cleaner and fluff to your heart’s content!

variations
14. Jagged edges.
15. Smooth, ink/marker on edges.
16. Scalloped edges.

make a bouquet
17. Take the heads off a bunch of silk flowers (I found this one at the dollar store)
18. Wrap the base wires around the stem
19. Secure with green floral tape. OK, so I was out of green floral tape and masking tape worked just fine.
20. Bunch them all together in a cool vase or martini shaker. If you made your flowers with little-ones, I suggest you display them in that fancy vase you inherited or got at your wedding that stays in a box in the cupboard. You know the one. These flowers won’t get messy or wet, and your child will feel so proud when they see you making a fuss to display their work prominently.
LOVE! Thank you. Can’t wait to feel like a kid and try this out.
so beautiful!
Thanks guys, I’m so glad you enjoyed!!!
Actually you should put it into your own book and publish it! Bet you wouldn’t have a problem submitting and getting book out! 🙂
These look like so much fun to make. I can’t wait to have an event to make them for. Maybe I’ll just make an event up so I have an excuse to make coffee filter flowers.
LOVE these! And your story about the mustached tambourine man made me burst out laughing at my desk.
What a clever idea – I’m dying to try this out with my girls! Thanks!
That was the best damn story I have read in a very very long time and a excellent craft to boot.
My day is suddenly better now. 🙂
Okay, this is the strangest, funniest post I have read in a long time, in any kind of blog. Do you have the newspaper clippings of this home invasion? Where is East Jersey? What towns are included? Hoboken, Jersey City, Rumson? I can’t believe that any so simple could look so good. Do you have pictures of this Bat Mitzvah? I am forwarding this to everyone I know. Do you know about the Jello Mold Mistress of Brooklyn? She has a blog. Somehow I see a connection. I am going out to buy coffee filters. Ann
Brilliant! And beautiful too! A great solution to the Lifetime Supply Size package of filters I bought at Costco just before I got a metal coffee filter!
COLOR ME BARBRA you guys sure know how to make my day! I’m so glad you enjoyed. If any of y’all make the flowers, please send me a picture or a link to what you made –I would sure love to see what you came up with 🙂
Nutbird (what a great name btw)
* No news clippings about the invasion, at least that I know of, but I promise you it’s the living truth! Seems that Tambourine Man was the boyfriend of a nurse assistant that lived with Grandnanna for a month following hip surgery…guess the nurse gave him a key and told him G’s daily routine so he could stay down there in a pinch…but he just stuck. Crazy stuff huh?
* To tell truth, Im not entirely sure where “East Jersey” is. You tell me! The Bat Mitzvah in question was near Elizabeth, but the goods were mailed (these are light and mail-n-fluff beautifully, btw) from Chicago. This was back in 2003 or so, and I never attended, so I don’t have photos. It was a friend of mine’s niece’s Bat Mitzavah and she wanted to make it really special…so a few of us girls spent a Saturday making these in an assembly line. Well, you know how it goes…someone brought margarita machine and a cheese tray and before you know it we had made almost double the amount needed to do the centerpieces. Then Becka was all I COULD REALLY GO FOR SOME PIZZA AND CHARDONNAY..and hell, there went the evening too! By the time it was all done we made enough purple flowers for centerpieces, napkin rings, chair backs….I was sure that Marriot ballroom was going to look like Barney exploded, but apparently it was well received. She came back from the event and reported everyone said it was “The Purplist Bat Mitzvah in East Jersey” Go figure? We haven’t talked in ages…this will be a good excuse to reconnect and ask about pictures.
*No I don’t know the Jello mold Mistress, but I am sure intrigued. I’m going to check her out right now!
Thanks again y’all!
Fabulous – both you post and the flowers. Need to get me some coffee filters now. Crazy people in crawl spaces, sounds like and adventure – just glad your Gran was ok.
Best tutorial I have read in…ever!
When’s the book coming out?
please help! I am making these flowers after seeing the gorgeous samples on design sponge, but they are way more washed out colours than what you have. how can i get the intense orange for the center and the intense green for the leaves. all i have is pale pastel versions of these colours, after hours and hours and hours (very literally – like 4 hours) of soaking. am i using the wrong paint? the wrong soaking container? please tell me what to do! thank you!
xexpat, don’t worry honey, just add more paint! what sort of paint are you using anyway? Time should help with the intensity factor, but the quick and dirty method:
*ditch the dye bath and squirt paint directly onto a wad of wet filters:http://www.flickr.com/photos/auntpeaches/4916064658/
*then squish and twist and wring the filters with your hands until the paint works through all the wet filters. this can take a lot of twisting and gets messy, so I suggest doing it outside or over a bathtub so you can add more paint or water as needed til you get the color you want: http://www.flickr.com/photos/auntpeaches/4915460923/
two more things:
*the drawback to using A LOT of paint is that the filters will stick together when they dry if you don’t separate them completely.
*it is almost impossible to get a true deep red color using this method (for some reason, regardless of paint type, the pigments fall apart and turn deep pink as soon as you add water). If you really want to try your hand at getting red, try clothing dye like Rit (get it at the grocery store)….I don’t have a recipe for how much water to add, but it will be significantly more concentrated than the directions on the box. Experiment and have fun!
i am using decoart crafters acrylic paint in a bottle. i kept adding and adding more paint to the bath, but will now try the direct squirt. here’s hoping, because right now, all the dried filters are an indifferent set of super light pastels…..
but tell me, what kind of paint did you use in the design sponge tutorial project you did?
thank you, aunt peaches!
ps. the same is true of deap reds in frosting for some reason – it’s just impossible to get red. must be something about red pigment…
is that so?! I never tried making red frosting…usually end up eating it before it hits the cake anyway 🙂
for the d*s tutorial I used same type of stuff as you, exact shades were “2606 Apricot” by Apple Barrel, and “23633 Yellow” by Craft Smart…as you can see, I have no brand loyalty. Just regular cheap craft paint should do it.
For the bath method, be sure the filters are dry when you add them to the bath so they really absorb the paint…if they get wet before hitting paint the rate of absorption will be much slower. I like the bath method because it gives more even/natural looking results, but the quick-n-dirty method will get you the coolest color results every time.
Hope it works out, xexpat!
Just made 5 dozen for a luncheon next weekend, thank you thank you!!!!
Do you have any tips on making them curl up more? Like shaped a little more like rosebuds or closed up peonies? Would like to use these for an event later in the year and want more variation. Thanx!!!
Laura I just saw your comment! To answer your question, yes, you can make very realistic rosebud shapes, but its not just curling up the petals, the assembly scheme is totally different from the peonies here. Easy, but different. I was thinking about posting some other style filter flowers, so let me put something together over the weekend and I’ll post a tutorial next week. Check back!
I just made a few flowers. YAY! They are so pretty & I’m planning on making enough for center pieces for my wedding next year. That being said….I need to use a better liquid acrylic. I didn’t realize it but I bought semi-transparent liquid acrylics at the art store. 🙁 They barely dyed the filters. Though they’d be great if you were going for a very very pale cream/white color. 🙂 I had a little trouble twisting the 2nd & 3rd layers. It was really hard not to have spots where there was some “bunching” — do you have any tips? Yours look so incredible. I’m sure mine will get better with some more practice.
Hey Crafty Kate! I’m so happy to hear you are going to use these in your wedding!!
*About the color…as you see, any paint will dye them a little, but you can get some intense colors by using more paint, or using little tubes of watercolor paint from the art supply store. It just comes down to experimenting.
*About bunching. The method above relies on serious twisting. If you are seeing gaps, twist harder and wrap the wire tighter, maybe a little higher up on the stem, too.. Another method is this one featured on design sponge using masking tape http://www.designspongeonline.com/2010/08/diy-project-peaches-coffee-filter-flowers.html
…..
also, keep your eye out the next few Fridays. I have gotten so many inquiries and emails about these coffee filter flowers I’m going to do some variations to help address. For the next month, I’m planning…
*9/10 roses
*9/17 centerpieces for $3 in 5 minutes
*9/24 daisies and dahlias
*10/1 giant poppies
So I’ll be back on Fridays for sure! These sound amazing! Any chance you could work some Cala lilies I’m the future, that would be fantastic!!
SOOOO exciting! Thanks, Aunt Peaches! I’ll definitely be back on Friday for updated flowers. 🙂 I love the plastic bottle flower tutorial, too. I saw something similar at a wedding & wondered how they’d been crafted. 🙂
Thank you thank you!!!
PS I was following the design sponge tutorial and found the “bunching/twisting” hard. I think your method here might be the trick. I’m going to try it this week. 🙂 Gosh…it was right in front of me all along!
I was actually LOLing while my kids were doing their homework! FABulous story…and tutorial. 🙂
I am so excited about these!! I’ve been trying to color tissue paper for flowers without much luck–they are pale, watery looking things after a great deal of mess. I plan to include some coffee filter flowers in my wedding decore, maybe even my bouquet!! (not until next June, but I’ll send you some pics. Thanks again!!
good read, post more!
What a great idea, and easy too (great for non-artistic folks like me ) I’m teaching myself polymer clay, and I have some mini vases that these would dress up very nicely! And thanks for the great story on a dull morning when I needed a smile and a laugh!
Hi Aunt Peaches! I just found your link via LadyChops and One Pretty Thing. I laughed right out loud at the story ~ Think I scared my pug! LOL
I am grabbing my coffee filters, Rite Dye, and craft paint right now. This is going to be a “with a purpose” project! My sister-in-law came over for a visit this afternoon and told me that she and my brother are going to renew their wedding vows in Feb. She then asked if I would do the decorations. So glad I found you! 🙂
DBabbit, I’m so glad you stopped by! These sound like a great addition to such a special event 🙂
Everyone –y’all really make me smile when I hear you are trying these at home. If you have pictures and you are willing to share, PLEASE send my way (emailauntpeaches@gmail.com)…or leave a link in the comments. #1, it wold make my day, and #2, I’m hoping one day I’ll have enough to post a collection of photos with links to the creators.
One day 🙂
ok, i’m knee deep in food coloring, coffee filters and rubber gloves making these (trying to) for our HAMA event. Haitian Amputees Mothers Alliance. We started out thinking it would be 25 bucks to come and drink wine and raise a little money for these moms and its turned into an event of about 300. it’s next week so i better get crackin on these!!!! they are going to adorn the commmittee members and the cocktail tables. thanks for making me chuckle in the mornings – i have you set to my google homepage.
Holy Frijoles! I swear I have had innumerable nightmares about people living in our attic or crawlspace without our knowledge (one even involved people living in the drawer under the oven…unlikely, but still really scary.) Then I read that it actually happened to your grandmother! Yikes!
Love all your flower tutorials…they’re even worth the panic attack I’m having now. 😉
Thank you Aunt Peaches…you make everything seem so much easier. Your directions and illustrations are so clear:) Thanks for the idea of attaching them to stems that are already made…makes them look so much more realistic.
You are totally awesome Aunt Peaches!!!
Beautiful! Coffee filter wedding here I come! Will be posting a link to your tutorial on my wedding inspiration blog tomorrow!
-caroline
http://cwfrosting.tumblr.com
This looks soooo beautiful!!!! BUT!!!! We don’t have such coffeefilters over here!!!! Would you believe that????!!! No, our coffeefilters would not work out for making these BEAUTIFUL flowers unfortunately….. 🙁
Sooooooo cool! Im going to make these with my students thanks for the great idea!
Heather
Good Morning! I just wanted to let you know that I am so addicted to creating the flowers from your tutorial. I created some in a soft pink, glued them to small branches from our yard and put them in a mason jar I frosted. It is sitting beautifully in the center of my kitchen table. Thank you so very much for sharing your ideas.
May your day be blessed,
Kimber
Finally, someone that uses round coffee filters. I have been looking for something like this for days. Everyone else seems to have cone filters for their project. Your flowers are gorgeous. I just made one this morning and it was real nice.
i love these so much! keep up the fabulous work!! 🙂
What beautiful flowers. Please make a whole blog about coffee filter crafts. Your talent is endless.
Patti
Thank you so much! Not only did i use this for my daughters party we recycled them into easter bonnets!
http://garmentodesigna.blogspot.com/2013/03/the-un-birthday-tea-party.html
http://garmentodesigna.blogspot.com/2013/03/easter-parade-2012-nyc.html
Peaches, I come to your blog time and time again. But, it’s not for the flowers- it’s for the side splitting stories about tambourine men and chicken cutlets. You kill me. Please keep on keepin’ on. And, please tell me how you procured your framed picture of Inigo Montoya. I’m sure there’s a story there too.
I must say that overall I am really impressed with this blog.It is easy to see that you are impassioned about your writing.
We shared your tutorial from Design Sponge on our Friday Finds linkup. We had a wonderful time making peonies for our home – we are SO ready for spring. I only wish we had fragrance oil of peonies so that they smelled as delicious as they look!
http://gadboisfamily.com/2014/02/28/friday-finds
Just LOVE your crafts, Aunt Peaches!! Don’t know why I didn’t discover you before. I am now an avid follower!