What is it with summer and tote bags?
I love me a good tote bag. I think people like great big tote bags in the summer because carrying a large bag makes their butt look teensy by comparison.
Okay, by people I mean me, but whatever.
A big bag is a good bag, but a big bag is a boring bag. Let’s snazz that sucker up!

Okay. Now that the totes and butts talk is over, let’s talk about something important: printable craft decals.
I know this has been concerning you. And I’ll confess here, my previous history with do-it-yourself printed decal goods was not great. The ink was never stable. It would bleed or warp all over the place. It never transferred evenly. One time, years ago, I made t-shirts that said HAPPY BIRTHDAY DOUG and the big portions of the print didn’t transfer so it came out reading APPY IRTHDA DO G.
People went around the party saying “Happy Earthday, Dawg!” in a British accent. It sounds cuter than it was. Doug was not impressed. And printable craft decals and I parted ways, forever…
…BUT THEN! Then I met up with one of my favorite people, Jonathan Fong, at the CHA show last summer and he showed me the light. This is it!
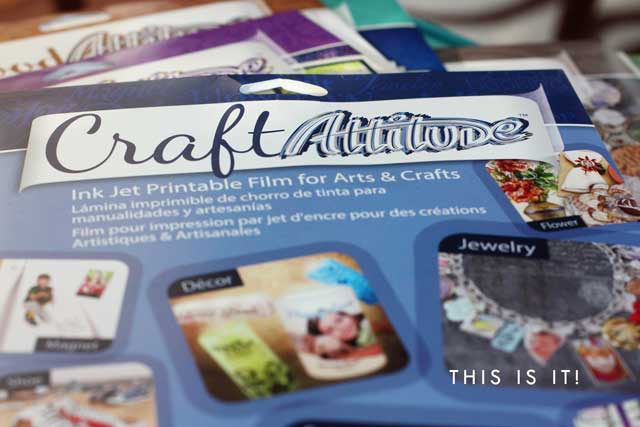
Craft Attitude is different than the other printable decals. It’s probably wrong for me to call it a decal. It’s like a cross between a super thin decal and a fruit roll up. Instead of printing to paper and hoping it transfers, you print to a super-thin, jelly-web-like sticker that you can stick to whatever you want; fabric, wood, plastic, metal…anything.
The sticker-like thingy comes pre-stuck to standard letter size paper, so all you have to do is run it through any desktop ink-jet printer, no big whoop. It sounds easy, and it’s easier than it sounds. Just load it in there like regular copy paper. My friend, you can handle this!

For this project I am adhering the Craft Attitude to fabric using fusible webbing, but Mod Podge or plain white glue would have been fine. When I first saw Jonathan’s demo, he was using a simple kid’s glue stick to adhere it to sneakers. Nifty much?
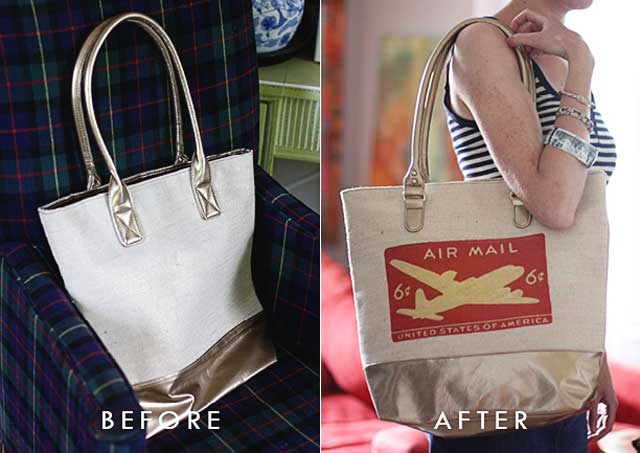
I have big plans for this stuff down the line, but I wanted to start out with a simple summer tote (see above credit in regards to butts). This bag was one of those things they give-away at the store when you buy too much makeup, which meant it was free. Boring, but free. I see this very same bag in thrift stores allllllll the time. Spanking new! A plain canvas tote bag would also work. You can even adhere Craft Attitude to leather (the procedure is a little different than the one I’m going to show you here). Let’s get started, okay?
Okay!

First I started out by printing images of vintage stamps. You can find those all over the internet or scan your own. I wanted a little Patriotic Americana here so I went with this image of a 6cent American stamp I found over at The Graphics Fairy. I reversed it in my computer (easy) and loaded my printer with the sheet of Craft Attitude. Boom. There it is! I also printed some other stamp images to play around. I’ll show you more in a sec.
After it prints out, you let the ink stabilize by not touching it for two hours. Two. Waiting is hard.

Then after that, just trim away the extra paper and peel of the paper backing. Again, it’s like a sticker. A really thin, slightly transparent, not-unlike-a-fruit-roll-up, sticker.

Now for the fusible webbing.
A note on fusible webbing: If I wanted to be able to pull off the sticker at a later date, all I would do here is iron. No webbing. But because I want it to be permanent, I went ahead and adhered it with fusible webbing. I could have used glue but something tells me glue and irons don’t mix. People who sew always have fusible webbing around the house, but as I am not much of a sewer, so I made do with a few strips of stitch witchery (also called hem tape), which comes in a roll at the grocery store (the laundry section, by the shoe polish). It’s cheap and I don’t have to wait in the cutting line at the fabric store.

After sandwiching the webbing between the sticker and the bag, I covered it with a cotton rag and ran a hot iron over it for 30 seconds, moving in smooth circles along the way. Magic. Sticks to the fabric and melts in a tiny bit. It’s not like those shiny decals that sit on the surface. It looks professionally printed — like this is how the bag came from the manufacturer. NEATO.
I liked the results so much I did the same process in reverse with a different stamp image. This stamp is from Switzerland. Might not be patriotic enough to make it for the 4th of July, but I love the colors next to the gold.

Then, I liked that so much, I had some fun and added some Craft Attitude to an old bracelet. This time no iron. Just a glue stick and I rubbed it on with my fingers and a pencil.

Need to get your hands on some Craft Attitude of your own? Click here to order! Shipping is FREE.
Intrigued? Want to see more crafty niftiness that can be made using Craft Attitude? Check some other bloggers who are making fun stuff this month: June 10: Jonathan Fong & Candie Cooper, June 13: Terri Sproul, June 17: Eileen Hull, June 20: Cindi Bisson, June 24: Jen Goode, July 1: Lorine Mason.
Full Disclosure: This is a sponsored post. The opinions and actions reflected in this post are my own. For real, you guyz. I wouldn’t be telling you about this stuff if it wasn’t awesome. And you can’t find it at every craft store on the planet, so who better to let you in on the secret but me? The nice people at Craft Attitude sent me a boat-load of the stuff as samples, so I didn’t have to pay anything to try it, but if I did, I wouldn’t mind. It’s that good. When my samples run out I’ll be ordering more myself. Thank you, Craft Attitude!