 |
| Clear plastic insulation sheeting makes it easy to double layers snowflakes! |
So let it begin.
Winter is here. Snow has fallen. The long underwear is out and frozen doorknobs are in.
Pretty and pristine as it might be, the draft from my over-sized 100 year-old picture window is unreal. Foam insulation tape and fleece lined curtains help but the draft is still noticeable enough to force me to resort to plastic sheeting. You know the stuff, the clear plastic “second window” that stretches and bunches and never seems smooth out no matter how long I blow on it with a hairdryer. I hate it. It’s ugly. It’s distracting. I can handle bars on the window and city dump trucks, but clear plastic sheeting? No Thank You!
Yet, despite my animosity, plastic sheeting is a small price to pay in exchange for a warm living room. I surrender. But if I am going to have to look out my window through wrinkled plastic, you better believe it’s going to look good!
Enter: Snowflakes.
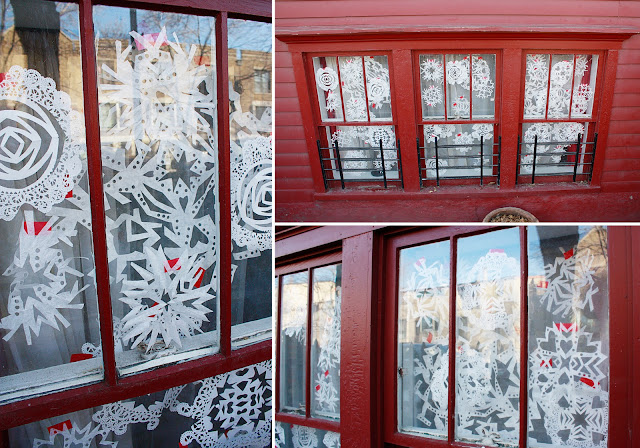
Decided to use the hollow space between the glass and the plastic to my advantage and tape snowflakes directly to the glass AND the plastic sheet, that way the 6″ gap in between the two creates a layered, three dimensional effect, almost like stage scenery or a pop-up book.
Now that it’s done, let me tell you, this thing is COOL. In fact, I might even be using this clear plastic sheeting business for a spring window display. I’m smitten!

Can I tell you something? This was one of those projects that was so easy and fun, and when it was done I couldn’t help but stand back and say Wow, I am really excited about posting this on the blog!
And then I took the pictures.
Ugggh.
What a disappointment. They look much better in person than on camera. There’s no dimension in these photos. Hurrumph. It’s a shame ya’ll can’t stop by the house and see them in person.
Next time 🙂

There’s no real tutorial here. If you are reading this blog I am going to make the assumption that you are comfortable making your own snowflakes and following the directions on the back of the box of plastic sheeting. However, I will share a tip or two I learned along the way….
- Try cutting snowflakes from coffee filters and paper doilies. They will let in more light and sprinkle the inside of your home with dappled sunshine. Gorgeous!
- Use a hole punch when cutting snow flakes to add major detail without the major scissor time.
- Get your snowflakes to stay flat by ironing them for 5 seconds over a damp towel.

- Tape half the snowflakes directly to the window, hang the top plastic insulation sheet, then tape the other half of the snowflakes to the sheet facing the window. Overlap and layer as much as possible!
- Try using electricians tape to attach your snowflakes. I could have used thread or transparent tape, but decided the red lends a special touch. Plus, now I can keep them up til Valentines, wahoo!